The earlier parts of this build can be found by clicking on these links:
Part One
Part Two
Well, it's late. For me at least. My mind is mushed, my fingers are a little numb from all the cutting and scribing, and I'm still finding the odd spider's web like strand of UHU while I type this. But I recon it's been a very productive day. All in, I reckon I've been able to dedicate a little over eight hours to this build today. And with dog walks, family time and honey-do's completed as well, I reckon that's no mean feat!
So, what did I do today? Let's have a look.
The first job of the day was the weatherboarding (also called clapboard). Having done the windows first, the hardest part of this job was to work the weatherboarding around them. A lot of measuring and dry fitting took place before I began gluing them together.
The cardboard is cut into 1cm high strips and layered 5mm higher on top of the preceding layer. These strips were then cut to the requisite length to fit around the windows. At least this first photo shows the guidelines quite well.
 Here's the same section, the back of the building, with the weatherboard completed.You'll notice the joints at each end are still visible. You'll see why shortly.
Here's a photo of the front of the ranch with an example of one of the boards cut to fit around the windows.
 When all four walls were complete, I set to work on the planking for the veranda. This was cut form a single piece of card. This was a bran flakes box in its previous life. I always go to the Bran Flakes boxes for larger items. It's the largest cereal packet we buy!
 Here's a view of all the sections. I took this photo while I let the glue dry. Those gable ends will need cut to shape before I'm able to go any further.
 Once they had time to dry, I glued the building together. The four walls were glued first, then glue was applied to the base and the two pieces fitted together.
 Here's a view from the back.
 Noe the edging work is done using 5mm wide strips of card.
 With this done, my attention turned to the roof. These began as two pieces of card, each 9.5ch x 20.5cm. I measured and drew in guidelines along the length of both at 5mm intervals. These would be for the shingle strips.
 It occurs to me that in all the posts I've done of my scenery making, I've never included a photo of one of the cereal packets marked out for cutting. In order to rectify this, and prove that I really do yse cereal packets for most of this work, I present the next two photos. In the first one, you can see the roof shingles these are each 1cm wide, and marked every 5mm by pressing on hard with my ball point pen.

 And here we are with the first section of roof complete. All I need to do is make another one!
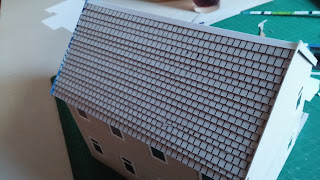
 With both finished and their edges trimmed, they are glued into place on the building as you can see in the next photo.
 Then I add a strip of card across the apex of the roof, and cut and affix the gable ends.
 I'm really pleased with the amount I've been able to do today.
 I'll need to make the porch roof tomorrow and crack on with the painting. I've a busy day at church tomorrow, but hope to have the latter part of the afternoon and evening free to work on this build.
 Will it be ready for our game on Monday? I sure hope so. Although I fear I'll still be painting it right up to the last minute before the game!
Part One
Part Two
Well, it's late. For me at least. My mind is mushed, my fingers are a little numb from all the cutting and scribing, and I'm still finding the odd spider's web like strand of UHU while I type this. But I recon it's been a very productive day. All in, I reckon I've been able to dedicate a little over eight hours to this build today. And with dog walks, family time and honey-do's completed as well, I reckon that's no mean feat!
So, what did I do today? Let's have a look.
The first job of the day was the weatherboarding (also called clapboard). Having done the windows first, the hardest part of this job was to work the weatherboarding around them. A lot of measuring and dry fitting took place before I began gluing them together.
The cardboard is cut into 1cm high strips and layered 5mm higher on top of the preceding layer. These strips were then cut to the requisite length to fit around the windows. At least this first photo shows the guidelines quite well.


Once they have been cut out, this is what I'm left with, including proof that I am using an emoty Bran Flakes packet.


Comments
Post a Comment