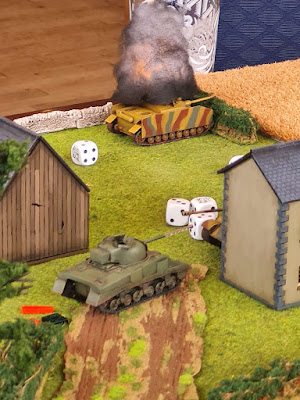
I have long been a fan of Too Fat Lardies' game 'What a Tanker!' So when I got a chance to attend Deep fried Lard a few weeks ago, and was asked if I'd consider putting on a game, I knew exactly what I wanted to do. Of course, the benefit to this is I have run lots of games in the past, so I already had the terrain and models I needed.
But it got me to thinking.
As you know, I run a lot of virtual games. By that I mean remotely run games from my dining table, shared with players from far and wide via cameras and video conferencing software. I talk all about how to do this sort of thing here. Anyhoo, one of the things that quickly becomes apparent when you're undertaking such ventures is the desire to make things more easily visible on the table. This makes it easier for remote players to get a better grasp of what is happening on the gaming surface.
To this end, I have always chosen to do away with What a Tanker Dashboards. They're alright if you have one or two tanks each, and there's space to keep your stuff away from the other players. But when you're running a game, you need all the stuff in one easily accessible place, and lots of little tokens next to each other normally makes a big mess. In order to solve this problem, I have always placed the tokens behind their respective tanks. Easy to see, and as long as you keep on top of what's happening, it serves as a helpful reminder to the players as to what is happening.
Damage, however is another problem all of its own.
Now, in the past, I've always let the players keep a note of what damage their tank has sustained. But I was wanting to be able to take things further, whilst keeping in line with the idea of tracking status by placing the official tokens beside each tank.
So I did what I am most know for in my gaming group: chits.
I simply went onto the reliable Publisher, and put together some graphics, added readable text, and bobs your relative of choice. I made them 25mm in diameter, printed them and stuck them with some brushed on PVA to some excellent 25mm diameter mdf bases I got from JB.
So that's twelve -1 Command Dice Permanent, three -2's and three -3's. Twelve -1 Command Dice Temprrary, Six Brew and Six Bail, and then six each for the different turret and hull damages.
And then I got to thinking, how cool would it be if I made some explosion markers? I'd seen some available over on the TT Combat website for a time. However, I reckoned it wouldn't be to hard to make a set for myself. So I came up with these...
How did I go about it you say? Well, I'm glad you asked...
It's all really rather simple. It begins with some tealights. I went for the flickering tealights with the replaceable batteries. I got a dozen for less than £7 on amazon. The prices tend to fluctuate quite a bit, so if you're thinking of doing this yourself, you just need to have a search online to find the best deal.
I then got some double sided tape and stuck this around the plastic edge of the tealight.
The next thing you need is some craft toy stuffing. You need surprisingly little of it, because you'll need to pull off a small clump and then tease it out. After faffing about with the shape, have a dry fit to make sure you can see the light flickering away. If not, tease it out some more. But don't do it too much or you'll ruin the illusion as the flame shape of the tealight will be obvious.
When you're happy with the result, get some PVA glue and apply it with a brush to the top of your tealight. I put a little just over the edge onto the sides. Then it's just a case of taking off the tape cover and pressing the stuffing into place. The double sided tape make sit stay in place while the PVA takes a while to dry.Leave them a while. Make sure they are dry. No point in making them fall apart when you do the next stage.
When fully dry, take them outside with a can pf black matt spray paint. You could use the expensive stuff if you want, but I find a can of the stuff from Poundland does a perfectly decent job. And then, using your protective spray booth (mine's a cardboard box with one side cut away and the top flaps stuck together in an upright position to provide more protection) apply your black paint. I focused it more on the bottom of the explosion, and then give a few light passes, leaving them darker at the bottom and lighter as you go up. The odd spot spray in any recesses helps sell the illusion.Make sure you look all around the marker when spraying, just to make sure you get all the bits painted in the way you feel happiest with.
Leave them to dry.
Then all you have to do is switch them on and enjoy your handiwork for hours to come!
Oh, and if you're like me and love having the things going for a while, the replacement batteries are as cheap as chips from loads of sellers on amazon and eBay.Have fun making these, and as always, thanks for taking the time to stop by!


Comments
Post a Comment