Despite losing two days and much of the sight in my right eye to a stinker of a migraine, I was delighted to get time on 18th and 19th November to work on my stone bridge. The impetus behind this build is our thoroughly enjoyable games of Blood Eagle, but a bridge like this can be used in many settings from the late Dark Ages through to the Second World War and beyond. As always I'm using old POS foam core to make the bridge and cladding it with cereal packet card. My go-to glue of choice is UHU. The first post on this project can be found here and my second one is here.
I confess I quite enjoyed cutting in the individual rows of bricks to the inside of the bridge. Oh, who am I kidding? I really like this sort of thing! If I didn't, I'd be buying resin and MDF kits all the time. I may have begun scratch building because of limited finances, but I keep on doing it for the love of the process. I also have to admit that I derive not a small amount of delight in knowing I've built something that will last for years of gaming out of stuff that would normally be thrown away.Anyhoo, talking about enjoyment, you can see in the photos above and immediately below the process of laying out the cladding for the external walls of the bridge. You have to remember to account for the width of the card (1mm here) in this part of the process. The length of the bridge meant that not even a mighty Asda's own Bran Flakes box is big enough for the task at hand, so I've had to split it into two sections. I'll add another piece over the centre of the bridge to cover the join. The stones measure10mm x 5mm.
With these finished, I turned my attention to the interior cladding on the walls. I cut these flush to the foam core using my craft knife. The foam core acts as my guide, although great care has to be taken to make sure you don't gouge out a chunk of the foam core!
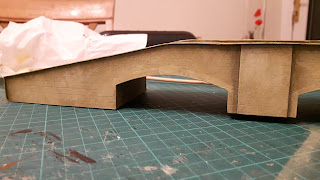
This is how the bridge looks at this point...
And with those walls covered, it starts to really look the part...
Here's the middle piece in place to cover the join.
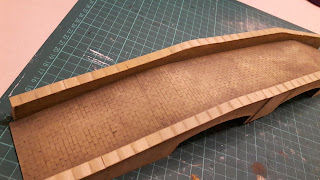
Work now began on the cobblestones that form the path of my bridge. These are 6mm x 3mm and took a long time to draw out. As with all the bricks, I need to press firmly with my ballpoint pen to make sure I have enough of an indent on the card to aid my painting.
Here's the card in place. Again, I had to do this in two sections as my cereal packet simply wasn't long enough.
Next up was the stones along the top of the bridge. I made each slab 10mm x 8mm. This was placed flush with the inside of the bridge and would leave a lip on the outer walls. The foam core is 5mm deep, allowing 2mm for the depth of the card cladding on each side and the remaining 1mm accounted for the joining buttress on the middle of the bridge. The next photos let you see the completed build before it was painted.
As with my Anglo-Saxon church, I used almond, black and a yellow ochre colour to paint my bridge. As I did so, it became apparent that I hadn't applied enough pressure to my pen when drawing in all the brickwork and cobblestones. Although I had been able to do a decent job with the painting, the successive drybrushing of the final stages had been completely unable to reveal all the details I had taken so much time and effort to create with my pen and ruler.
The result left me feeling both frustrsted and useless in equal measure.
Don't get me wrong. It looks good enough.
But with only the horizontal lines visible on the walkway, I was soon considering scrapping the whole thing and starting over.
So I did what any sane person would do. I gave up on it. It hoped it would look better in the morning.
So the following afternoon, I decided there really was only one thing to do. With the game taking place the next evening, I had to make good with the build. So I got out my paints and my finest of brushes and began painting in the paintwork. Yes, I'm that mad! It took about four hours, all in. All of it freehand with my brush. Every brick (which was easy to see as I adjusted my view in relation to the light source) and every cobblestone (where more guesswork took place as I couldn't make out a single vertical line to help me) was painted.
Some of the stones were not completely outlined.
And then, caught somewhere between the elation of finishing and going cross-eyed by the process, I was able to admire the rescue attempt. This is why the troll never got painted...
And the game? Oh, yes. That was another joy.
We started in great faith.
However, life had another rough hand to play. I had to abandon the game last Monday evening when diarrhoea struck. It was joined by vomiting within two hours. Soon I was doing the latter so much that I had passed out and a G-Doc visited. He discovered that my blood pressure was so low that I found myself inside an ambulance and off to hospital for a while. Infective Gastroenteritis and Collapse isn't fun, I can tell you.
So the bridge, like this post, has taken an awful lot longer to complete than I thought. And whilst I still feel rather weak even though I'm planning to go back to work tomorrow, I thought I'd finally finish writing up my experience. If nothing else, it explains why I've been off the grid for a while.
Wish me good health for tomorrow!


Comments
Post a Comment