As I'm sure you're aware, I'm trying to put together some specific Anglo-Saxon scenery for our upcoming games of Blood Eagle. The plan is to give my stalwart Saxons something to defend from the vile Viking raiders. Of course, if my usual inability to roll anything decent on my dice continues true to form, then at least my scenery will give them something to cower behind in abject terror.
I wanted to build some small vegetable patches. I decided that I wanted small patches for the village that could be grouped together to form longer sections for a monastery setup. And although this build is being done for my Anglo-Saxons, the resultant pieces of scenery could be used for many different time periods. I expect to be able to use mine in pretty much any period. They'll appear in ancient, medieval, early modern, Napoleonic and WWII.

In terms of construction, I had considered using some corrugated cardboard. After all, this would have the run rigs or ploughed look I was after. However, I soon realised it wasn't going to work. Sure, there's an issue about making sure your card doesn't warp in the process. But my decision not to go down the corrugated card route was more fundamental than that. I wanted to represent small garden patches where the use of a plough wouldn't be practical. This meant I was looking for a more irregular series of grooves on my scenery pieces. Which meant I'd have to make them myself.

Thankfully I remembered some old Star Trek cards I had. Made of plasticard, these have served a variety of purposes over many years of gaming. They have been bases for my 1/35 scale WWII bigatures. I simply looked out three and got to work. They are the same size as you average bank card. Of course, you can tell from the above photo that I forgot to take a photograph of them before I started the project. being tired and lazy, I couldn't be bothered to go back up to the loft to find some more. So I just turned them over and took a photo. Sorry about that. But I get ahead of myself.
I roughly calculated that I could get six runs on each card, and set about kneading my milliput. I then rolled out some milliput sausages. This caused quite a regression to my days making plasticine worms in nursery school...
Anyhoo, these were then laid out on the cards one at a time. I ran my finger round both sides of each 'worm' to get the correct shape. Be warned though, it's a bit fiddly to say the least. Once done, they need to be left for a few hours to dry. One of the many brilliant things about milliput is that it doesn't shrink or crack. No danger of them contracting as they dry and warping the cards. of course, for me this meant having to leave them overnight.


Next comes the painting phase, which I must confess took place in stolen half hour sections, during which I appear to have forgotten to take any progress photos. Sorry about that.

Now, as I'm using cheaper acrylic paints and adding water to them to help the colour soak into the sand, these end up being very wet. I like to leave them a couple of hours to dry properly. As you can no doubt guess by now, this meant I had to leave them overnight.
Being a cheaper make of acrylic, my paints don't have the kind of viscosity and covering capability you're going to get from your miniature paint of choice (mine is Vallejo). Sometimes however this can be a good thing. This is one of those times. When it comes to drybrushing, I rely on the coverage capacity of my paint to make my job easier. Instead of blending a number of shades, I simply use my Cinnamon Brown. With each layer of drybrush I apply a lighter coverage. The strength of the almost-black undercoat dulls any drybrush. By applying successively lighter layers, I allow the paint to slowly build up on the raised areas. This naturally creates a gradient of shading. It only works when the undercoat is thoroughly dry. And it takes relatively little time to get a result that looks like it actually took a lot longer to achieve.
I then took a small amount of my Vallejo Model Colour Stone Grey and went and picked out the ballast and cork pieces. Now I have to confess, this is a lot brighter than you want the finished result to be. So once it has dried, I applied a wash of black and cinnamon brown to them. This dulls sown the overall colour and adds shading to them.
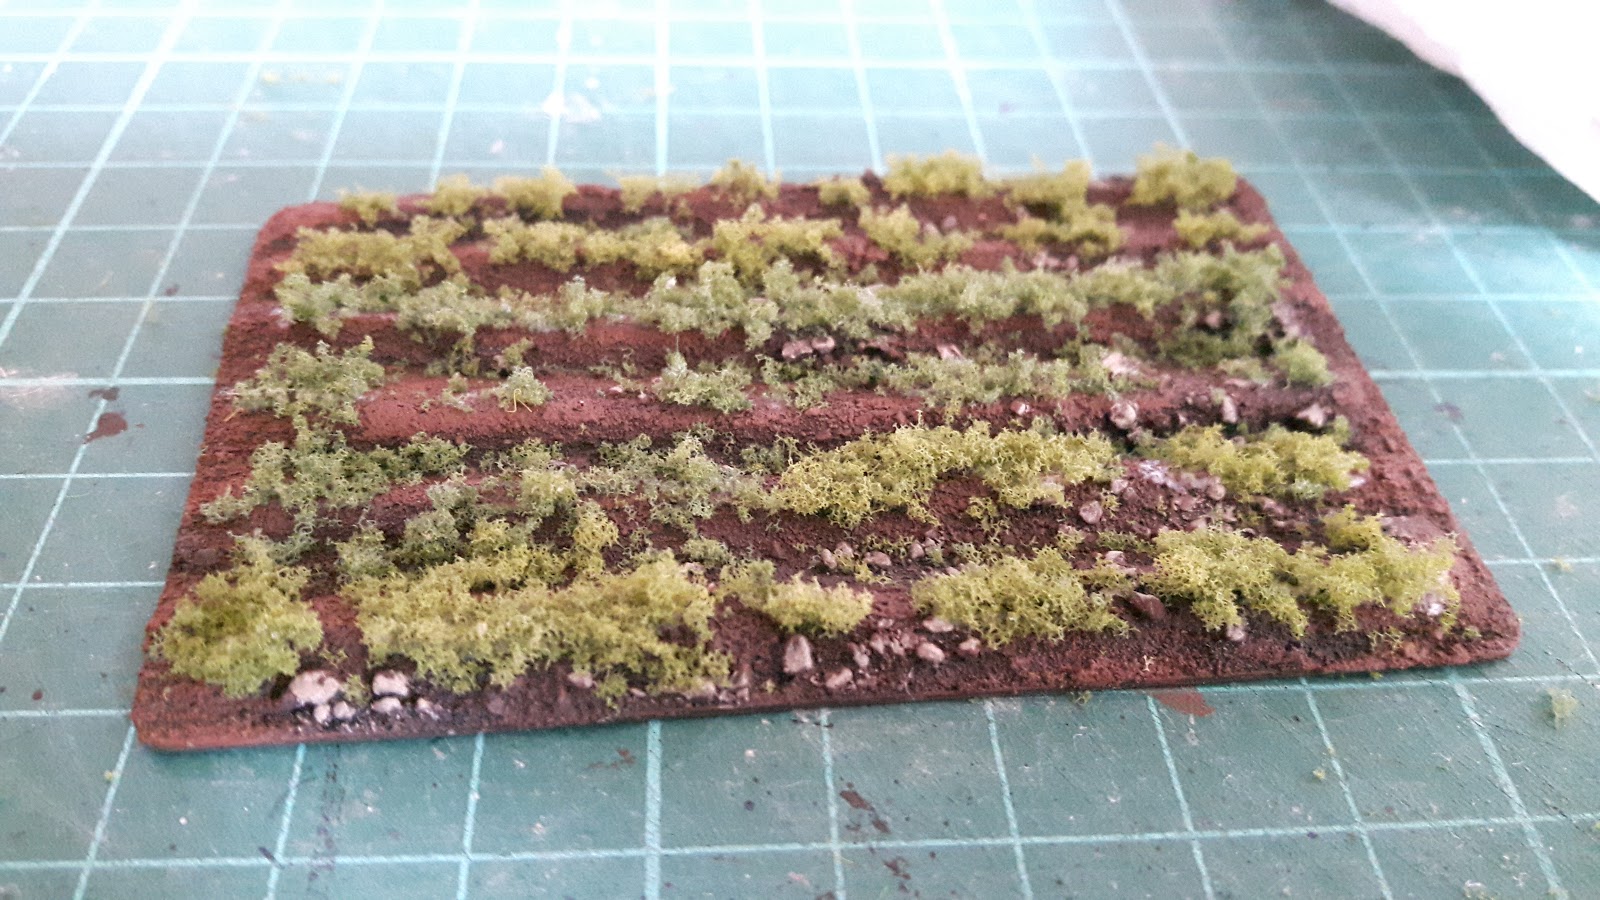
And so we come to today, where I had the opportunity to enjoy flocking the vegetable patches. Of course, this is another fiddly job. I worked two rows at a time. I applied some PVA glue with a brush, leaving occasional gaps along the ridge. I allowed this to be guided by the placement of the stones I had painted. I then applied Woodland Scenic's Coarse Turf to represent the crops. It's quite fiddly, but I use my tweezers to apply the turf along the length of the ridge, section by section. Once the turf is in place I simply open the tweezers a little and push the turf into the glue with my other hand. I find this stops the turf from falling down into the gaps where you don't want it.


Glad to chat your blog, I seem to be forward to more reliable articles and I think we all wish to thank so many good articles, blog to share with us. dnd dice
ReplyDelete