
365 Challenge Day 14 Hours 15.5
Last Saturday I began the process of making a church for my Anglo-Saxons. With two houses built and ready to paint (which you can read all about here and here) I wanted to make the largest building for this project. Not because I was bored with the houses. No. I had been intending to make the Chieftain's House next. Trouble was, my plans were varying in size as much as the archaeological record shows! So I decided to go ahead and make a stone church under the simple rule of comparison. If I could get the church to look right, I would then be able to scale my Chieftain's House somewhere between it and the houses I had already made.
Now when it comes to making stone buildings, you have a number of options. You could go for insulation foam. This stuff is great as you can inscribe your brickwork with as simple a tool as a ball point pen. You can texture the surface further by scrunching up a piece of tin foil and gently rolling it back and forth over the surface. It's robust, quick and easy. But I don't have any, so I won't be using this method.
You could go the all out Rackham way and cast sheets of plaster of Paris and scribe your details on with dental scribes, floating dry powder on top to replicate additional texture. I've had a go in the past and it looks stunning, but it's incredibly messy and time consuming. Nor do I have any plaster to hand. So this isn't an option for me either.
A third option is to make the shell of the building out of your material of choice, size it (I use PVA with a little water) and then apply some air drying clay. You can then sand it smooth and inscribe details. Personally, I've had equal success applying polyfiller and it's much cheaper. But I'm out, so this isn't an option either.
A fourth option is to make the shell of the building out of foam core and remove the card layer from the outer surface. Like option one you can then inscribe the detail with a ball point pen and texture away to your heart's content. It's a great method with wonderful results. But be warned, this is the stuff of scale modellers, not wargamers. It looks great, but removing the card from one side of the foam core weakens the strength not only of the model as a whole, but more specifically of each wall. If you want a durable model that will last the rigours of the wargames table, this isn't your best option.
So what am I going to do? Armed with my usual budget of basically zilch, I have two choices. I'll be building my church with foam core. As it's old POS stuff, it's a little warped as usual. I'll therefore be using joints to hold everything together properly. This of course requires something to be put on top. I can either use a second layer of foam core with the card removed from one side, or trust in my usual material of choice: cereal packet card. The former choice allows me to take advantage of the texture with a series of washes, the latter means I need to apply textured paint (which I don't have) or rely on brush technique to apply the semblance of texture.
Realising I was wasting time thinking about cladding and not actually building, I decided it was high time I looked out my foam core, my trusty ball point pen, metal ruler and large plastic set square and set to work drawing everything out. This sounds a lot simpler than it actually was.
I decided to base my model on the wonderfully atmospheric St Laurence Church in Bradford on Avon. Opinion is divided as to whether it was built in the 700's or around 1000 AD, but what is interesting is it's striking simplicity. There are a number of photos of this beautiful church, but I found the following illustration particularly helpful as I began making my model.

I decided to make the nave (the main body of the church where the congregation would...well..congregate) 18cm by 10cm. And in keeping with my usual measurements, I made it three stories high, or 15cm high along its length. The two ends are 21cm high at the apex of the roof, giving the roof a slope of 40 degrees. Measuring this angle with a protractor is really important. It means you can ensure that all of your roof sections have the same pitch.
The sanctuary was slightly narrower than the nave so I decided to make it 8cm wide. I've made mine 9cm long, but had to add an extra 5mm to this length to allow for the joints that will fit into the nave walls. In the same way, the transept is 6cm wide and 7cm deep, the actual length being 5mm longer to again allow for the joints.
 Of course, with all the parts drawn out on the foam core, the time came to start cutting. As always with foam core, let the blade do the cutting, don't force it. If you need to force your blade, it's blunt. Break it off to the next sharp piece. Otherwise you'll end up ripping the foam. Remember to make at least three cuts, keeping your blade as vertical as possible to the ruler to make sure your cut is straight. Your first cut should go through the top layer of card. Your second pass of the knife cuts through the foam itself. Your final cut will go through the bottom layer of card. I cut out all the pieces first and then go round them cutting around all the joints. And as you can see in the next photo, the offcuts pile soon begins to look as imposing as the pile of completed sections!

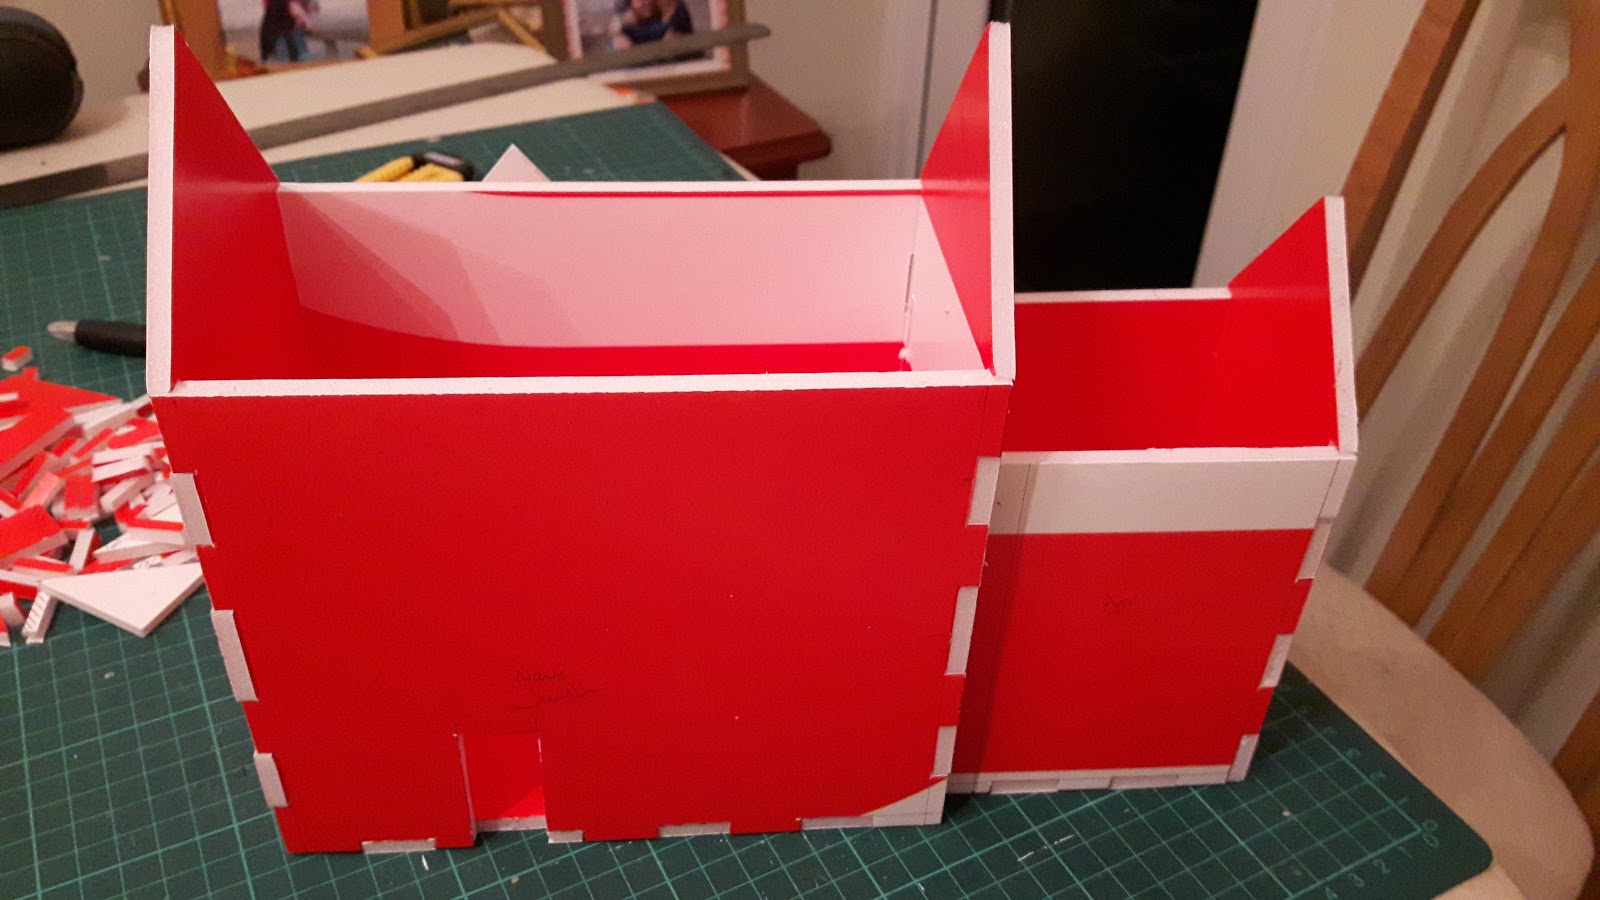
 The above view is taken looking at the north side of the church with the transept in the foreground. There will be a door in the transept but it hasn't been cut out until I determine what method of cladding I'm going to use. The nave runs along the east west axis, with the sanctuary to the east.
 On the opposite south side of the church we can see the church entrance. And if we have a look in from the top you can see how all he parts fit together nicely.
 Removing the transept and the sanctuary lets you see how I've joined them to the nave. You can see how I've used joints for both the walls and the floors to create a strong hold.
 I should probably point out that the 365 Challenge numbers at the top of this post were correct last Saturday when I did all this. We're obviously 20 days into the month now. Sadly I haven't had an opportunity to do anything more since then...


Once this is done, I do what we like to call a dry fit. Basically this is building the structure without glue. It's the time where you get to see if all your planning has actually paid off. And as the joints hold the structure together really well, you can get to both appreciate your work and see if any bits need a little fix. Fortunately those three hours of planning were time well spent. When pushed together, my Anglo-Saxon Church looked like this:


Comments
Post a Comment